
Spring mornings that smell like warm chocolate and cinnamon feel like a gentle invitation to gather. When the kids press their faces to the oven glass and grandparents whistle a soft tune while they set paper liners into the tin, the kitchen becomes the heart of small, perfect moments. Sharing simple treats makes holidays feel less like a production and more like a memory in the making laughter over powdered sugar, a quiet moment placing a tiny marshmallow ear, the way someone always sneaks an extra mini egg.
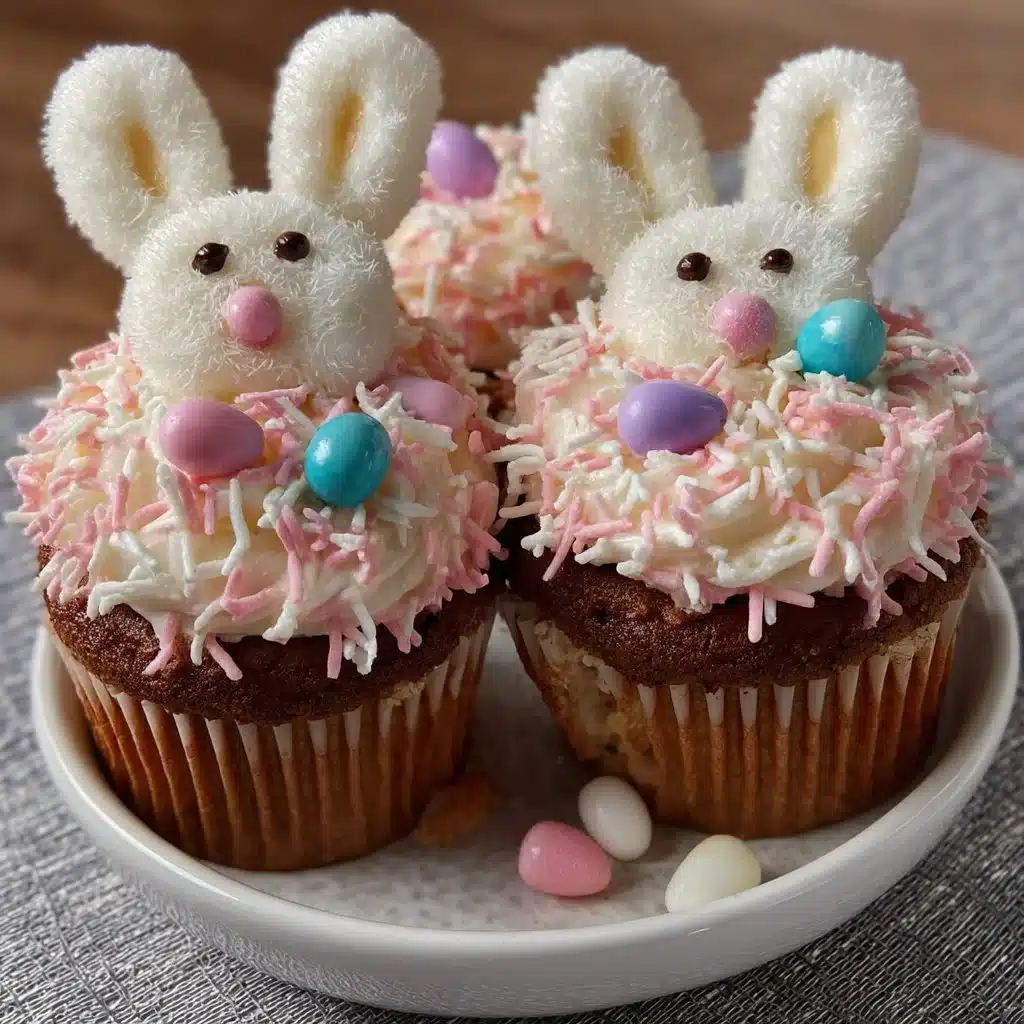
Baking Easter Bunny Cupcakes turns busy holiday prep into a low-stress, high-smile activity. You don’t need fancy piping tips or hours of practice to get the effect; a few smart steps and playful bits transform a boxed mix into something everyone will photograph and devour. These cupcakes pair the easy joys of chocolate cake with fluffy white frosting and coconut “fur,” so they look like an adorable bunny without demanding baker-level finesse. Kids can help press coconut, place ears, or pick which mini egg becomes the nose, which keeps the whole process cozy and collaborative.
DishGrub tests recipes across busy-family schedules and comfort-food cravings. We simplify classic ideas into dependable results that save time and bring people together. Each recipe on DishGrub relies on approachable ingredients, clear steps, and little touches that make food feel homemade even when you lean on a boxed mix. Our kitchen notes come from repeat tests in real homes: we value techniques you can trust on weeknights or weekend celebrations. These Easter Bunny Cupcakes reflect that approach: quick, forgiving, and endlessly charming. Follow the steps below, and you’ll have cupcakes that look like they took longer than they did, so you can spend more time enjoying smiles around the table.
Why this recipe works
Chocolate cake delivers a familiar, crowd-pleasing base that pairs perfectly with a bright white frosting contrast. Using a boxed cake mix keeps the bake consistent and fast, which matters when you want to focus on decorating instead of mastering batter ratios. White frosting provides a stable, spreadable canvas for the shredded coconut, which creates the soft “fur” texture without any elaborate piping. Marshmallows make natural bunny ears because they’re soft, tall when cut, and easy to coat with pink candy melts or frosting for a hint of color. Mini chocolate eggs add a playful, edible nose that ties the holiday theme together.
This approach uses reliable shortcuts without sacrificing presentation. You get dramatic results from simple materials: a cupcake tin, basic frosting, a bag of shredded coconut, and a handful of candy. The decorations stay in place when you press them into slightly tacky frosting, so the cupcakes survive short car rides or dessert tables at family gatherings. The recipe highlights ease and visual payoff a core DishGrub promise so you can make something festive without a day in the kitchen.
Steps to make Easter Bunny Cupcakes
Ingredients
- 1 box of chocolate cake mix
- Ingredients called for on the box for cupcakes (eggs, oil, water)
- 1 can of white frosting
- Shredded coconut
- Mini chocolate eggs
- Marshmallows
- Pink candy melts or pink frosting

Instructions
- Prepare the chocolate cake mix according to the package instructions and pour into a cupcake tin lined with paper liners.
- Bake the cupcakes for the time specified on the box and cool them completely on a wire rack.
- Frost the tops of the cooled cupcakes with white frosting using a spatula to create a slightly peaked surface.
- Sprinkle shredded coconut over the frosting to create a fluffy fur texture and press lightly to adhere.
- Cut each marshmallow in half vertically and dip the cut side into pink candy melts or spread pink frosting on the cut side to make ears.
- Attach a marshmallow ear on each side of the cupcake by gently pressing into the frosting so the ears stand upright.
- Place a mini chocolate egg in front of each cupcake on the coconut to form the bunny nose and serve.
Serving ideas
Serve these cupcakes fresh at room temperature so the frosting stays soft and the coconut feels light and airy. Arrange them on a tiered cake stand or a platter lined with a sheet of parchment for an easy centerpiece. For family-style dessert, place a small plate of extra mini eggs and a bowl of colorful sprinkles nearby so guests can customize their cupcake noses or add a collar of sprinkles around the base. If you host a kids’ decorating station, set out frosting bags, extra coconut, and a tray of marshmallows for little hands to create their own bunny faces.
For a brunch spread, pair the cupcakes with simple, balanced items: sliced fruit, yogurt parfaits, and a pot of coffee or hot chocolate. The cupcakes work as a sweet note after savory items like quiche or ham. If you bring them to a potluck, package them in a disposable cupcake carrier or an open container with a loose lid so the ears don’t get squashed; a shallow box with a bit of tissue paper will protect the decorations while you travel.
If you want a more grown-up twist, serve the cupcakes alongside a salted caramel sauce or a rich ganache drizzle for guests to add sparingly. The chocolate cake and coconut provide a flexible base that welcomes extra flavors without overwhelming the playful look.
How to store it properly
Store decorated cupcakes at room temperature for up to 24 hours if your kitchen stays cool and you plan to serve them the same day. The marshmallow ears can lose their sheen or become sticky in humid conditions, so keep them on a covered platter away from direct sunlight. If you need to store them longer, place the cupcakes in an airtight container in the refrigerator for up to three days. Allow refrigerated cupcakes to come to room temperature for 20 to 30 minutes before serving so the frosting softens and the coconut regains its light texture.
If you bake cupcakes ahead and plan to decorate the same day, freeze the cooled, undecorated cupcakes for up to two months. Wrap them individually in plastic wrap and place them in a freezer bag. Thaw them at room temperature, then frost and decorate. Do not freeze cupcakes after applying shredded coconut and marshmallow ears those textures don’t revive well after freezing and thawing.
When transporting, choose a flat-bottomed box and line it with a sheet of nonstick baking paper. Pack cupcakes snugly to avoid shifting, and place a layer of bubble wrap or a clean kitchen towel over the top to cushion the ears. Keep the box level during travel.
Recipe tips for success
Work with room-temperature cupcakes and frosting to make decorating easier. Cold cupcakes can cause frosting to set too quickly, while frosting that’s too warm will slide off. If the can of frosting seems stiff, warm it slightly by placing the closed can in a bowl of warm water for a few minutes and stir until spreadable. A small offset spatula or the back of a spoon helps you build a gentle peak for the bunny’s back.
When you press shredded coconut onto the frosting, do it in a light, patting motion pressing too hard flattens the texture. Use sweetened coconut for a whiter, fluffier appearance; unsweetened tends to be drier and more textured. For marshmallow ears, slice the marshmallow with a serrated knife dragged through once to avoid tearing. If you use pink candy melts, temper them briefly over low heat and dip just the cut side for a clean look. Alternatively, spread a small amount of pink frosting with a fingertip or small brush onto the cut edge.
If the ears don’t stay upright, push them in at a slight angle so the marshmallow sits partly in the frosting and partly on the coconut bed; that creates better support. You can also use a dab of frosting behind each ear for extra hold. For very small kids, consider substituting paper ears attached to toothpicks insert the toothpick into the cupcake under the paper ear so the edible parts remain safe for little mouths.
Make it your own
Swap chocolate cake mix for yellow or vanilla if you prefer a lighter flavor and brighter contrast against the white frosting. Try coconut cake mix and reduce the coconut topping for an extra coconut-forward bite. Experiment with different colors for the ear accent: pastel candy melts, edible dusting powder, or food coloring mixed into a small dab of frosting work well.
Switch mini chocolate eggs for other candies: jelly beans for a classic Easter look, pastel M&M’s for crunch, or small chocolate truffles for a richer nose. For a nutty note, press a halved toasted almond behind the mini egg to act as a whisker base and add a subtle crunch. If you like filled cupcakes, pipe a spoonful of raspberry jam or peanut butter into the center after they cool; a small hole reveals a delicious surprise under the coconut fur.
Turn this idea into a themed party activity by setting up a decorating bar with different toppings in clear bowls. Offer options such as colored coconut, edible glitter, tiny marshmallow bits, or candied fruit pieces. Label each bowl so helpers can mix and match quickly. For an adult twist, brush a tiny bit of flavored liqueur on the cupcake tops before frosting to introduce a subtle boozy note.
Frequently asked questions
What if my marshmallow ears slump or fall over?
Marshmallows slump when the frosting is too soft or if humidity soaks into them. Press each ear into the cupcake at a slight angle so part of the marshmallow sits against the frosting and part rests on the coconut surface; that improves stability. Use a small dab of white frosting behind the ear as an adhesive and let the cupcakes sit for 10 minutes before moving them. If humidity affects the ears, coat the cut side with candy melts or thin pink frosting to create a moisture barrier that helps them hold shape.
Can I make the coconut look brighter or whiter?
Yes. Choose sweetened, finely shredded coconut for a softer, whiter look. You can also briefly toast the coconut very lightly for a golden tint, but don’t toast if you want the snowy bunny fur effect. If your shredded coconut looks dingy, try a fresh bag, as coconut can discolor if it’s old or exposed to air. For a super-white appearance, add a small pinch of powdered sugar to the frosting before spreading; that makes the frosting brighter and enhances contrast with the chocolate cake.
How do I adapt this for allergy concerns (nuts, dairy, or gluten)?
For nut allergies, verify that all candies and toppings are processed in nut-free facilities and avoid cross-contaminated brands. For dairy-free or vegan needs, use a dairy-free boxed cake mix and plant-based milk or oil when the package allows, and swap canned frostings with vegan frosting brands or make a simple dairy-free buttercream. Use vegan marshmallows for egg-free diets and check that mini chocolate eggs or alternative candies are dairy-free. For gluten-free cupcakes, choose a certified gluten-free cake mix and check that all add-ins and decorations carry a gluten-free label. Always read ingredient lists and, when in doubt, label your tray to inform guests.
How far in advance can I prepare these cupcakes?
You can bake and cool the cupcakes up to two days ahead and store them in an airtight container at room temperature if your kitchen stays cool. For longer storage, freeze undecorated cupcakes for up to two months and thaw before decorating. Avoid decorating more than a day in advance when using marshmallow ears and shredded coconut; they stay freshest and most visually appealing when assembled the same day you serve them.
Conclusion
For a quick, playful dessert that brings people together, try this Easy Bunny Cupcakes recipe on Your Cup of Cake for another simple take on festive bunny treats.
Print
Easter Bunny Cupcakes
- Total Time: 35 minutes
- Yield: 12 servings
- Diet: Vegetarian
Description
Delightful Easter Bunny Cupcakes made from chocolate cake mix and topped with fluffy white frosting, coconut ‘fur’, and playful decorations for a festive treat.
Ingredients
- 1 box chocolate cake mix
- Ingredients called for on the box (eggs, oil, water)
- 1 can white frosting
- Shredded coconut
- Mini chocolate eggs
- Marshmallows
- Pink candy melts or pink frosting
Instructions
- Prepare the chocolate cake mix according to the package instructions and pour into a cupcake tin lined with paper liners.
- Bake the cupcakes for the time specified on the box and cool them completely on a wire rack.
- Frost the tops of the cooled cupcakes with white frosting using a spatula to create a slightly peaked surface.
- Sprinkle shredded coconut over the frosting to create a fluffy fur texture and press lightly to adhere.
- Cut each marshmallow in half vertically and dip the cut side into pink candy melts or spread pink frosting on the cut side to make ears.
- Attach a marshmallow ear on each side of the cupcake by gently pressing into the frosting so the ears stand upright.
- Place a mini chocolate egg in front of each cupcake on the coconut to form the bunny nose and serve.
Notes
Serve at room temperature and arrange on a tiered cake stand or platter. Store in an airtight container for up to three days.
- Prep Time: 15 minutes
- Cook Time: 20 minutes
- Category: Dessert
- Method: Baking
- Cuisine: American





